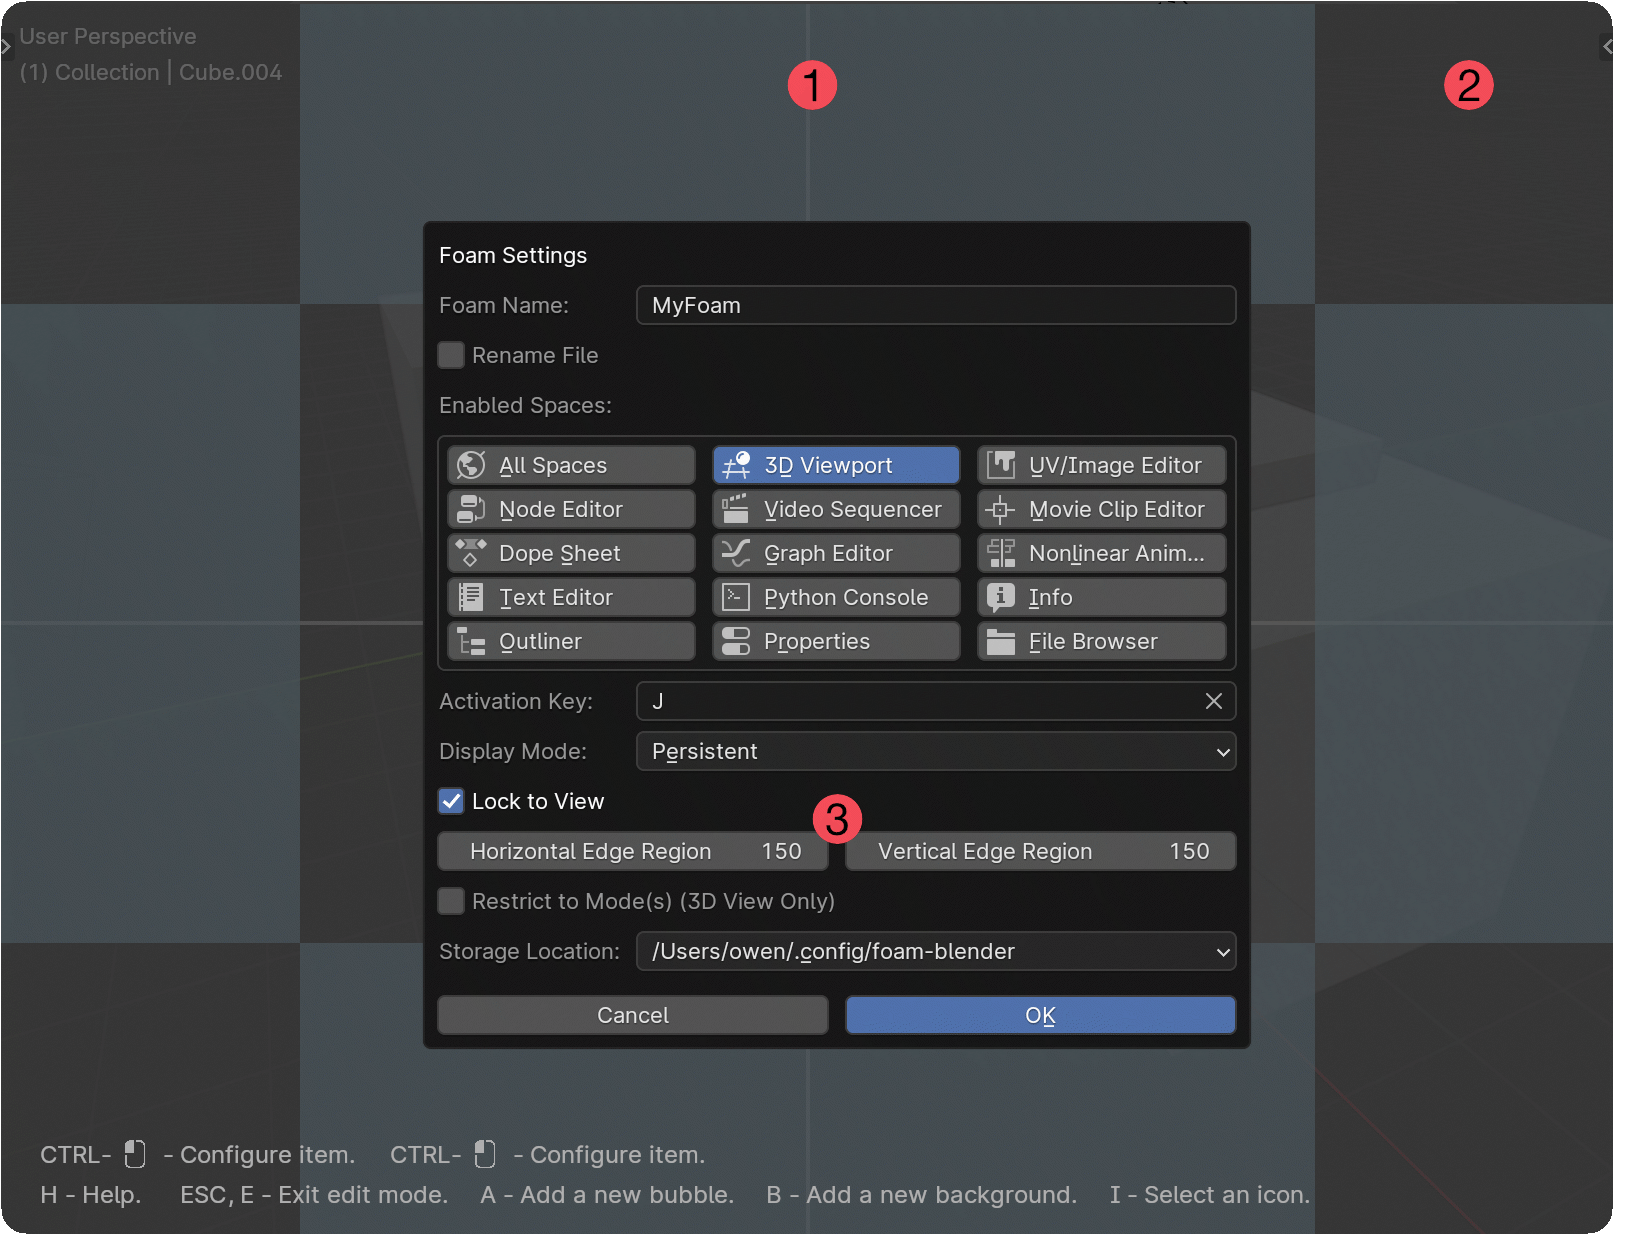
You can access settings for a foam in edit mode. Ctrl-click on the view outside of any bubble or background to bring up the Foam Settings dialog.

Foam Name
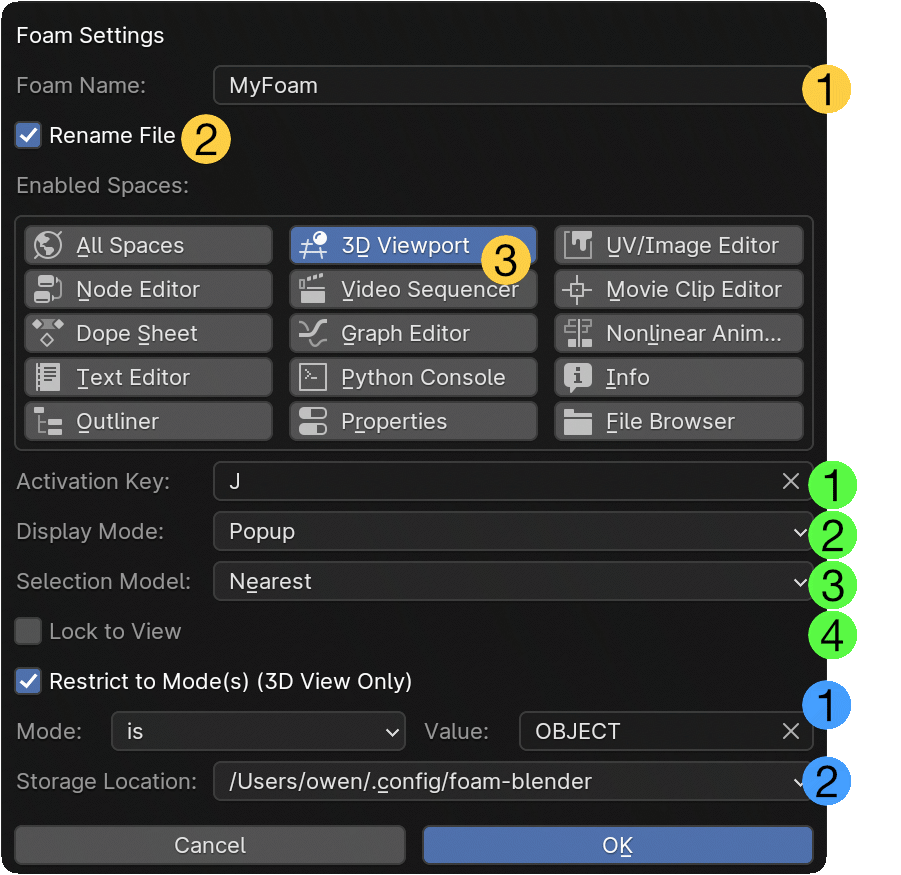
You can change the foam name here ![]() . This name shows up in the Foam Manager. By default changing the name will not change the name of the file on disk. When you change the name you will see the
. This name shows up in the Foam Manager. By default changing the name will not change the name of the file on disk. When you change the name you will see the Rename File option ![]() . Check the box and the file will be renamed based on the new name when you click OK.
. Check the box and the file will be renamed based on the new name when you click OK.
Spaces
![]() By default new foams are configured to open in the 3D viewport because this is the most frequent use case and has most support. However it is possible to allow the foam to open in any combination of space types. Click to set the space or Shift-click to add or remove individual space types. The All Spaces option is provided as a shortcut for selecting all the spaces individually.
By default new foams are configured to open in the 3D viewport because this is the most frequent use case and has most support. However it is possible to allow the foam to open in any combination of space types. Click to set the space or Shift-click to add or remove individual space types. The All Spaces option is provided as a shortcut for selecting all the spaces individually.
Activation Key
Each foam is assigned to a single activation key ![]() . When this key is pressed (and some other key binding has not already handled it - other add-ons or Blender itself may do this) the first foam that is assigned to the key will be shown. As well as keyboard and number pad keys, NDOF (3D Space Mouse) and additional mouse buttons can be used.
. When this key is pressed (and some other key binding has not already handled it - other add-ons or Blender itself may do this) the first foam that is assigned to the key will be shown. As well as keyboard and number pad keys, NDOF (3D Space Mouse) and additional mouse buttons can be used.
Display Mode
![]() By default new foams are set to Popup mode. This behaves a little like a radial menu - while you have the activation key held down the foam is visible. Depending on the Selection Model below, releasing the key while a bubble is highlighted (in orange) will activate the bubble.
By default new foams are set to Popup mode. This behaves a little like a radial menu - while you have the activation key held down the foam is visible. Depending on the Selection Model below, releasing the key while a bubble is highlighted (in orange) will activate the bubble.
If you change this option to Persistent then you use the activation key to turn the foam on and then again to turn it off. In this mode the only available Selection Model is On Click. This allows you to make persistent tool palettes that you can move around. If you also set Lock to View below then you can keep bubbles stuck to the sides of the view even if it gets resized. Foams that are both Persistent and Locked will stay enabled when you switch to different screens (e.g. Modeling, Layout, Sculpting etc.)
Selection Model
![]() In Popup mode there are three different selection models. In Persistent mode, only On Click is available.
In Popup mode there are three different selection models. In Persistent mode, only On Click is available.
- On Click – Bubbles are highlighted just a little lighter than their normal background colour. You need to click on a bubble to activate it.
- Nearest – Bubbles are highlighted in orange (or their styled highlight colour). The bubble that is closest to the pointer will be highlighted. If you release the activation key while a bubble is highlighted you will activate it. Note that this means that invoking a foam will always cause a bubble to be activated.
- Radial - Bubbles are highlighted in orange (or their styled highlight colour). The bubble that is closest to the pointer on a line between the foam origin and the pointer will be highlighted. If you release the activation key while a bubble is highlighted you will activate it. If you leave a blank space around the origin of your foam you can make a safe zone where no bubble will be highlighted.
Lock to View
![]() if this is enabled, then the edit mode foam will have "sticky" border regions where bubbles will stay relative to the edges
if this is enabled, then the edit mode foam will have "sticky" border regions where bubbles will stay relative to the edges ![]() and corners
and corners ![]() and a centre region where bubbles will stay relative to the centre of the view. These zones will move as the view resizes.
and a centre region where bubbles will stay relative to the centre of the view. These zones will move as the view resizes.
 You can change the size of the horizontal and edge regions separately
 ![]() . Foams with Lock to View and Persistent Display Mode will stay on the view when you change screens or restart blender.
. Foams with Lock to View and Persistent Display Mode will stay on the view when you change screens or restart blender.
Restrict to Modes
![]() You can optionally restrict foams to show only in particular 3D View modes. In this way you can have different foams show in different modes – such as the default builtin foams bound to the Q key in OBJECT, EDIT and SCULPT modes.
You can optionally restrict foams to show only in particular 3D View modes. In this way you can have different foams show in different modes – such as the default builtin foams bound to the Q key in OBJECT, EDIT and SCULPT modes.
Storage Location
Starting with Foam 1.0.0 you can now change the storage location for each of your foams. Choose from any of the writable asset paths configured in Preferences or choose Blend file to store the foam as a text object in the current blend file. If you do this, remember to save your blend file.