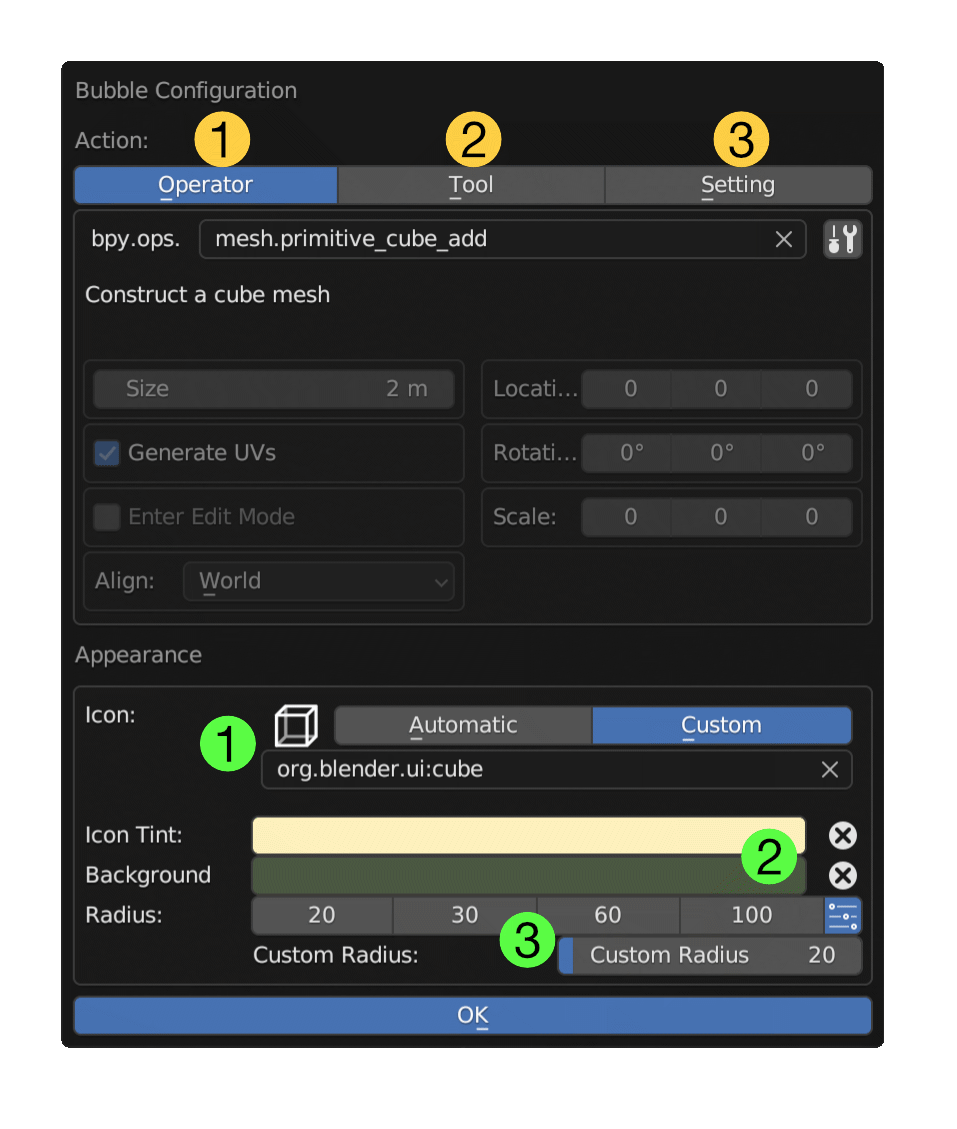
When you right click on a bubble in Edit Mode you open the Bubble Configuration Dialog. Here you can change all of the visual and functional aspects of a bubble. There are two main sections to the dialog, Action, which configures the function of the bubble, and Appearance, which controls the visual properties of the bubble.
Action
Each bubble performs a single action. There are several different types of action that correspond to different kinds of interaction with Blender. Each of these types has a button at the top of the Action section of the dialog.
Operator - the bubble will execute a Blender or Add-on operator. Blender provides most actions in it's user interface as operators that can be called to make changes. Add-ons provide operators in the same way that Blender itself does so they can all take advantage of core services like undo and redo. This is the default action type for new bubbles.
Each operator has different parameters that affect its operation. When you select an operator the dialog will update to show these parameters. We discuss the available options below.
Tool - the bubble will switch the current Blender Tool. Tools are specific modes of interaction, such as the default Box Select or the transformation tools like Rotate and Move. Blender has different tools for different modes. In most modes the available tools are listed in the tool palette (toggled with T). Sculpt mode brushes are also tools.
Setting - the bubble will display and change a Blender or Add-on setting. Settings come in various types. There are simple on-off settings like showing scene statistics or the 3D grid, enumeration settings like choosing a renderer, numeric settings like sculpt brush size.
Once you choose an action type the rest of the Action section will change to show any appropriate parameters for the action. We'll talk about this area below under separate headings for the different Actions. First we'll discuss the appearance section.
Appearance
The bottom section of the dialog deals with the appearance of bubbles.
Icon - change the icon. Note that for Enumeration and Numeric Setting bubbles the icon will be faded to make the bubble's value more visible.
Automatic - If possible Foam will choose an icon. If no icon appears to the left of the button when Automatic is selected, Foam can't find an icon for the selected action.
Custom - choose an icon from the list below. (Or alternatively use the Icon Picker)
Icon Path - when Custom is selected you will see the icon path and can change it. If you know the icon you want to use, choose it here. If you would rather search for an icon visually, close the bubble dialog and use the Icon Picker.
Make This The Default - (not pictured above). If you choose a custom icon that is different from the automatic choice you will see a button labelled "Make This The Default". Clicking this button will write the icon choice for this bubble along with any selected parameters to a configuration file so that Foam can use it as an Automatic choice in the future.
-
Colours - change the icon tint and background colours.
Clicking on these colour swatches will open the standard Blender colour picker panel. You can take advantage of this to copy the hex colour value if you want to apply the same colour to multiple bubbles.
Icon Tint - Change the tint colour of the icon. If the icon is white then the tint will apply at full strength. Some icons have shades of grey or other colours and in this case the tint will mix with the icon colours so that they still show some differentiation. For coloured icons - like the Blender sculpt icons - you will need to experiment a little. You can move the dialog to make sure the bubble is visible and play with the tint colour until you find something you like.
Background - Change the colour of the bubble background circle. this is an absolute colour and replaces the default.
When you have set a custom colour for a bubble, a small circle-x button will appear to the right of the colour swatch to allow you to revert to the default colour.
-
Radius - Change the size of the bubble.
The Radius control presents several default button radius choices. Click on the custom slider button at the right of the choices to set a custom radius.
Actions
As mentioned above a bubble can have one action chosen from the three available types. Depending on the type of action the rest of the Action section will change to present the available settings. We'll look at each of them below.
Operators
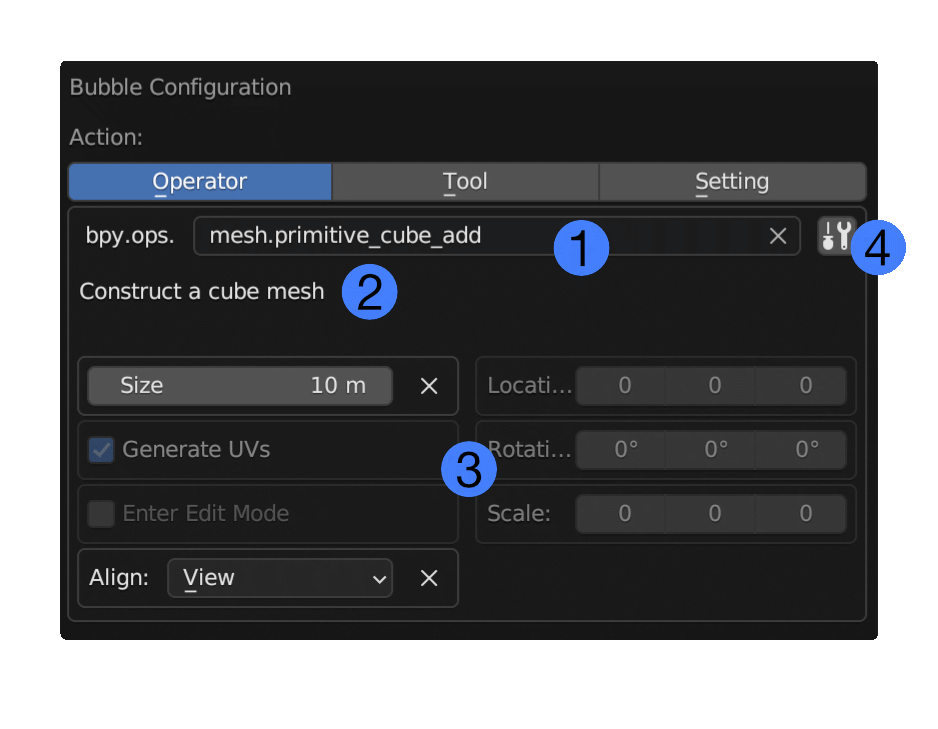
Operators have a number of different parameters depending on their definition in Blender or in an Add-on. The Operator configuration area is divided into a number of sections.
-
Operator Path - This defines which operator the bubble should invoke when it is clicked or triggered by releasing the Foam activation key. Foam scans all available operators in Blender and active add-ons when you first open a foam. You can type in the box to filter the available operators.
Some operators have surprising names so it can be frustrating to look for them here. Fortunately Blender provides a way for users to see which operator a particular interface element activates. We recommend you turn on Python Tooltips in Blender Preferences. This will make Blender show the operator name and parameters in user interface tooltips. See Edit Foams for where to find this setting. We show you what you are looking for in the tooltip below.
Note that the string "bpy.ops." appears before the operator name. This is to remind you that the part of the operator you need comes after that. So if you see "bpy.ops.mesh.primitive_cube_add" in the Python Tooltip for an interface element, you can remove "byp.ops." from the beginning and just search for "mesh.primitive_cube_add" here.
-
Operator Documentation - This line shows the documentation defined in the operator if there is any. Use this to help verify you have the operator you are looking for.
-
Operator Parameters - Each operator defines the parameters it can accept. This section shows them all and allows you to edit them. These are the same parameters that you will see in the Blender Keymap preferences panel and in the Adjust Last Operation dialog.
When you first select an operator these fields will be greyed-out. When they are grey they show the defaults that the operator will use if you don't change them. Once you make a change, the parameter will be drawn brighter and a small x will appear to allow you to revert to the default state.
Note that any parameters you set here can affect the automatic Icon that Foam chooses for an operator. Some parameters show drop-down lists with icons for each item (e.g. object.light_add has a type parameter to pick the light type and each light type has its own icon). When you click Make This The Default the icon choice is stored for the operator with the particular set of parameters that you've selected.
-
Enter Operator Information Manually - In rare cases a bug in Blender or another Add-on can cause crashes in the Foam operator interface. When this happens the Bubble Configuration will automatically give you a simplified interface. This button lets you switch to that interface if you need to. We don't recommend using it if not necessary. If you think you do need to, please contact us on Discord. Any operators that will automatically enable this will be listed in Known Issues.
Operator Path Example
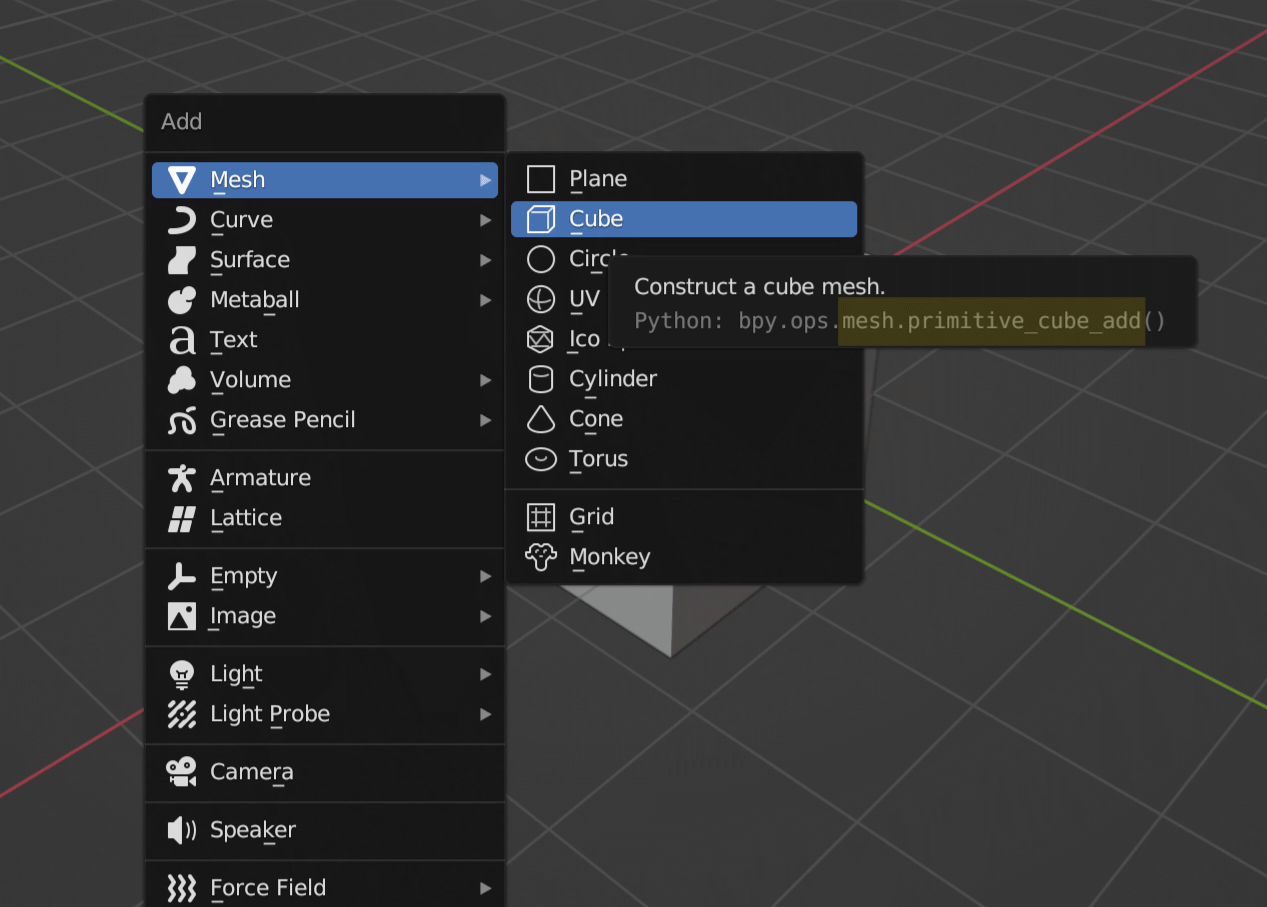
Here we're using the SHIFT-A add menu to find the operator that is run by the Add->Mesh->Cube menu item. Python Tooltips are turned on and we can see that the tooltip shows a description of the operator and the Python code to activate the operator. The code includes the name of the operator: "bpy.ops.mesh.primitive_cube_add()". We are interested in the part highlighted in yellow, "mesh.primitive_cube_add".
Tools
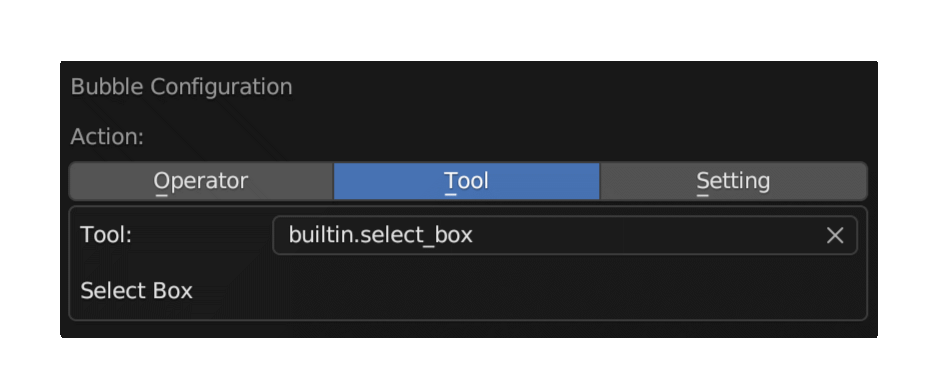
Tools are the simplest of the three types to configure. Like Operators, Tools have a search box where you can find the tool you need. Behind the scenes, tools are parameters for a single operator, wm.tool_set_by_id. Because it's not easy to find the identifier of a tool to use with this operator, we have a separate section for Tools. Foam scans for available tools on startup to give you a list to pick from. You can still use Python Tooltips to find the Tool you need but instead of looking for the operator, you are now looking for the value of the name parameter.
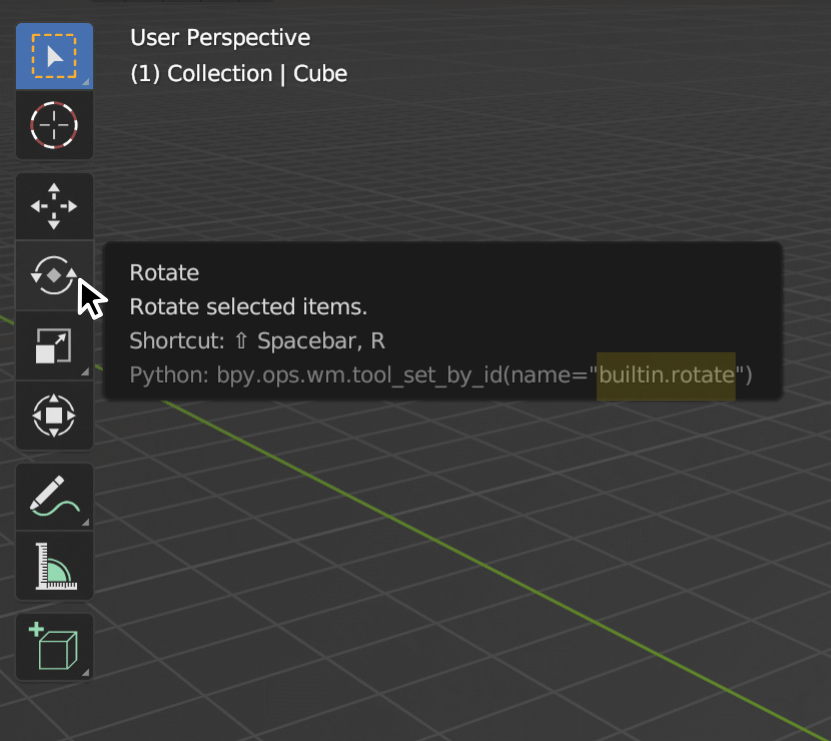
Here the value we are looking for is builtin.rotate., highlighted in Yellow.
Settings
The setting configuration area can change depending on the type of setting. Some settings are on-off switches, like show_overlays, and have no configuration options. Settings that control numerical values have several controls to limit minimum and maximum and scale the movement of the pointer.
Settings are more difficult for Foam to catalog on its own so their location and definition are specified manually in the Foam code. Some settings, like the current renderer (rendersettings.engine), can potentially produce side effects, including instability, so Foam takes extra steps to keep them from causing problems.
For this reason some settings are not available in Foam, we are adding more with every release.
Setting Types
There are three main types of settings that Foam supports in the user interface. The built-in sculpt mode foam shows all of them:
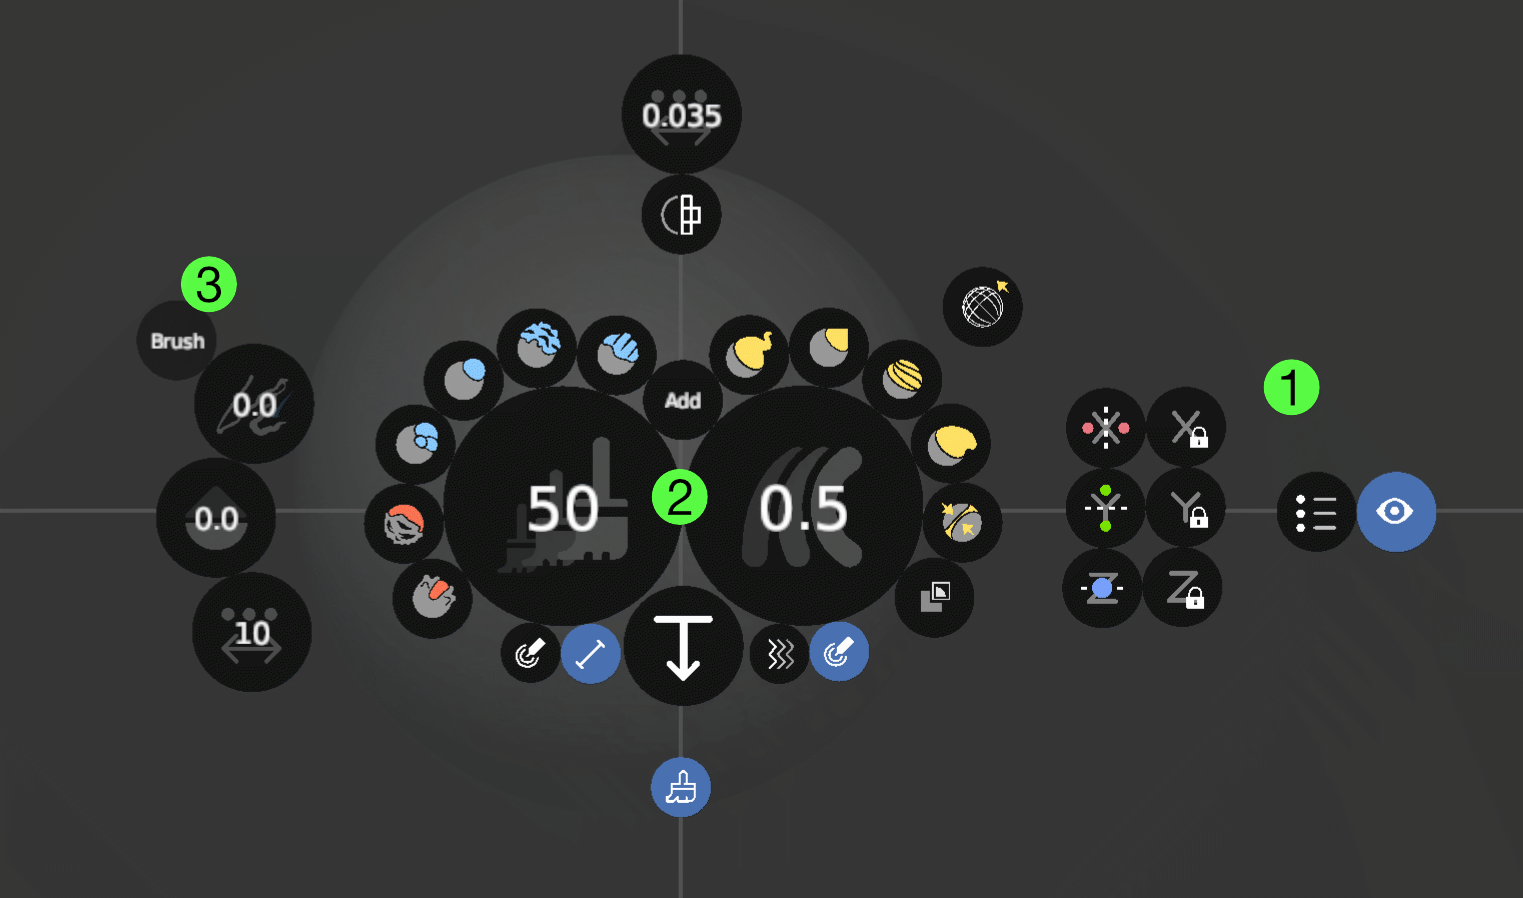
Switch Settings - toggle a setting on and off. In the image above, all the bubbles out to the right are switches. The blue bubble with an eye icon at far right was on when the screenshot was taken, it turns on or off visibility of the brush circle indicator. The one next to it is off and toggles visibility of the scene statistics overlay in the top left of the view.
Numeric Settings - show and allow you to change a numeric value. The two large bubbles in the centre show brush size and strength. When you click and drag up or down you can change the value. These settings have a number of options that we'll describe below.
Enumeration Settings - show and allow you to cycle through enumerations. The Bubble containing "Brush" will toggle to "View" and back when clicked and sets the way that brush jitter is interpreted.
Simple Settings
Settings with no controls, that is Switch settings and Enumeration Settings, look a lot like Tools.
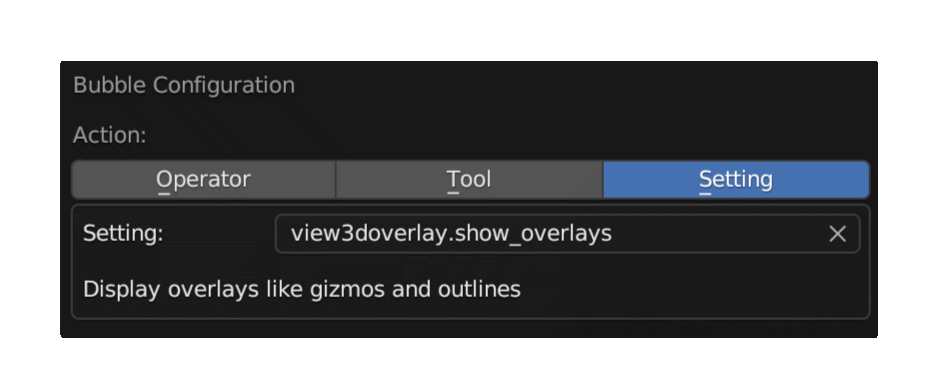
Like Tools, you'll click into the Setting path and choose a setting from the list. The corresponding Python tooltip for the show_overlays setting above is found in the view header:
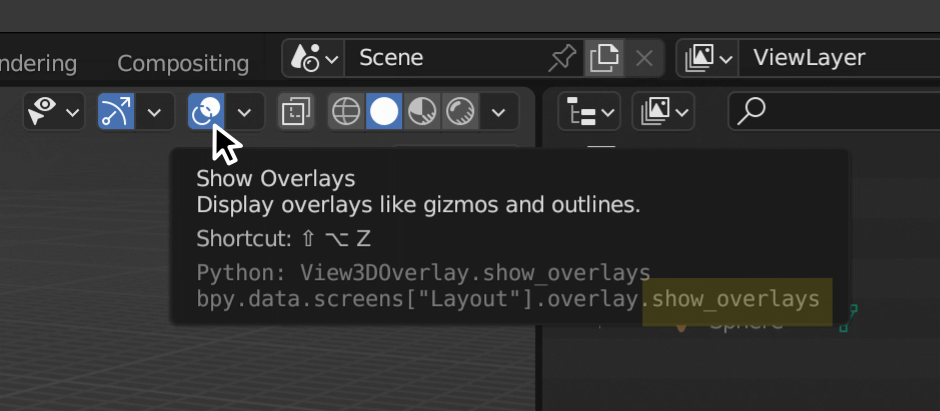
Note that the tooltip shows overlay.show_overlays rather than view3doverlay.show_overlays. For now you need to experiment a little when there are multiple settings with similar names.
Numeric Settings
Numeric settings control decimal values that can vary over a large range. In some cases Blender specifies limits for these values but even when it does, the limits can be impractical. For these settings, Foam allows you to specify your own limits. Note that limits set in Foam will not restrict other parts of Blender from setting larger or smaller values.
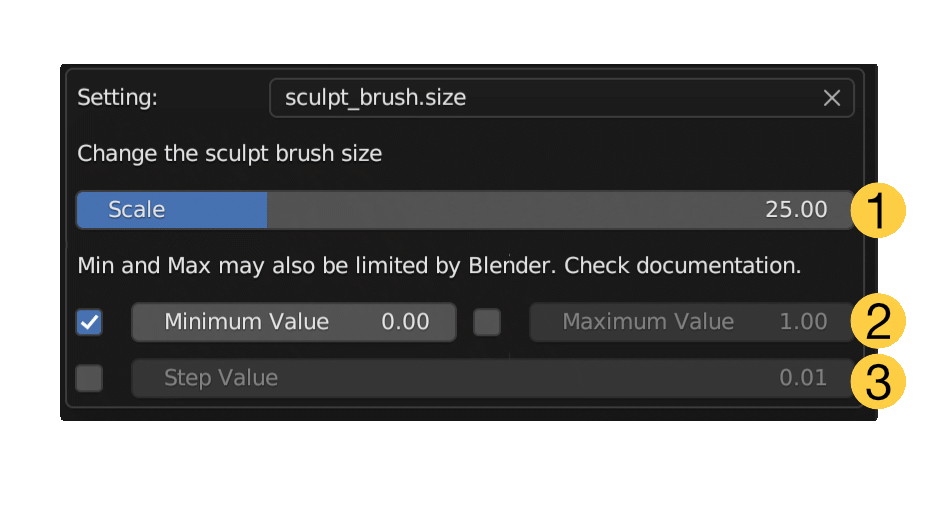
Scale - Sets a scale for the cursor drag movement. Scale is effectively the number of pixels the pointer needs to move to adjust the value up or down by 1.0. Larger scale values give more sensitive changes to the value.
-
Limits - The minimum and maximum value for adjustment of the value. As the note above these settings points out, these limits are only on Foam's adjustment of the value, other parts of Blender are free to adjust the value within the hard limits set by the setting definition.
Each of the limit values and the Step Value discussed next have checkboxes next to them. Foam will only apply the limits if the corresponding check box is checked.
-
Step Value - if enabled, Foam will only set the value to multiples of the step. This does not affect the scaling - if the scale is set to 25 and the step value is 0.1 then the value will increment or decrement once for every 2.5 pixels but will only take on multiples of 0.1. Again other parts of Blender are free to set values that are not a multiple of this value.
Related Pages: - Persistent Foams - View Locked Foams - Editing Foams